
Pflegeanleitung für Blechblasinstrumente
1 Aug 2026, 00:05
Einleitung
Sehr geehrte Kundin, sehr geehrter Kunde,
wir gratulieren Ihnen herzlich zum Kauf eines hochwertigen Qualitätsproduktes aus dem Hause Miraphone.
Ausschlaggebend für eine lange Lebensdauer ist die richtige Behandlung und Pflege Ihres Blechblasinstrumentes. Pflegen Sie deshalb vor allen Dingen die beweglichen Teile des Instruments wie Ventile, Druckwerk und Züge in regelmäßigen Abständen.
Da bei neuen Instrumenten noch kein Speichelansatz in den Rohren vorhanden ist, sollten Sie das Instrument in der ersten Zeit vor dem Blasen mit Wasser durchspülen. Dies erleichtert die Spielbarkeit des Instruments erheblich und schützt das Instrument vor Korrosion. Entfernen Sie nach jedem Spielen
den Speichel aus dem Instrument, indem Sie die Züge herausnehmen und diese entleeren. Bitte verschließen Sie das Instrument nicht im Etui oder Gigbag, sondern lassen sie es außerhalb trocknen.
Im folgenden haben wir für Sie die wichtigsten Pflegehinweise zusammengestellt. Bei Fragen oder Problemen wenden Sie sich bitte jederzeit an uns oder an einen unserer qualifizierten Miraphone Händler.
Wir wünschen Ihnen mit Ihrem Blechblasinstrument von Miraphone über viele Jahre Freude und Erfolg.
Ihr Miraphone-Team
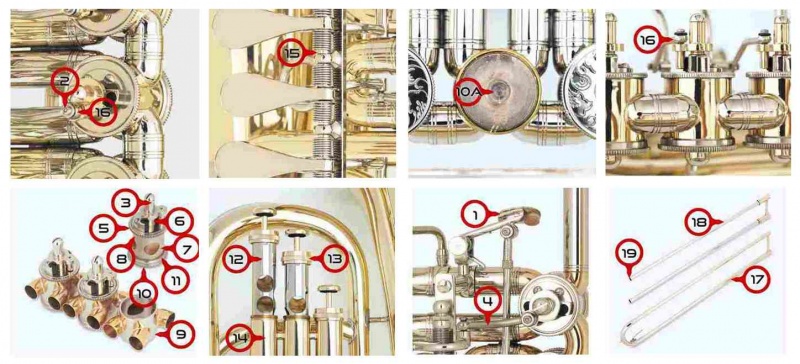
Schaubilder Ventil- und Druckwerkpflege
1 - Tonausgleichdrücker (Trigger); 2 - Minibalschraube; 3 - Flügel; 4 - Miraphone Minibalschubstange; 5 - ATV-Ventil; 6 - Langes Lager mit Bohrung; 7 - Ventilgehäuse; 8 - Justierstift; 9 - Ventilbüchse; 10 - Kurzes Lager mit Bohrung (Schraubdeckel entfernen); 10a - Ventillager unten (kein ATV-Ventil); 11 - Schraubdeckel; 12 - Ventil; 13 - Oberer Schraubdeckel; 14 - Ventilbüchse; 15 - Drückerachse; 16 - Kugellagerg.
Schaubilder Posaunenzugpflege
17 - Außenzug; 18 - Innenzug; 19 - Stiefel.I. Pflege der Ventile
Behandeln Sie die Ventile in regelmäßigen Abständen mit den beiliegenden Ölen.
Ölen der ATV-Ventile am Lagerstift
Das Ölen der Ventillager erfolgt oben am Ventilhals (6) und unten durch Lösen des Schraubdeckels (11) am Ventillager (10) mittels der kleinen Bohrung am Ventil.
Ölen der Drehventile am Lagerstift
Das Ölen der Ventillager erfolgt oben am Ventilhals (6) unter dem Flügel und unten durch Lösen des Schraubdeckels (11) am Ventillager (10a).
Verwenden Sie nicht zu viel Öl. Das Öl kann nach innen fließen und Ihre Maschine zähläufig machen. Verwenden Sie zum Ölen des Ventilhalses und der Ventillager das Miraphone Stiftöl.
Der Aus- und Einbau der ATV-Ventile
• Um das Ventilgehäuse (7) aus der Ventilbüchse (9) herausnehmen zu können, lösen Sie zuerst die Minibal-Schraube (2) mit dem Torxschraubenzieher vom Flügel (3). Halten Sie beim Herausdrehen der Schraube das Minibal-Gelenk fest, da das Druckwerk durch die Drückerfeder auf Spannung steht.
• Lösen Sie nun den unteren Schraubdeckel (11).
• Halten Sie das Ventil (5) von oben und drücken Sie es nach oben heraus.
• Spülen Sie das Ventil (5) mit lauwarmem Wasser und säubern Sie die Ventilbüchse (9) mit einem fusselfreien Reinigungstuch (D). Tragen Sie anschließend einen feinen Fettfilm (Selmertuning-Slide) auf die Ventilbüchse (9). Verreiben Sie dazu am besten das Fett mit Ihren Fingern.
Bitte beachten Sie, dass das Selmer-tuning-Slide zwischen Einund Ausbau nicht ins Innere des Ventils gelangt!
• Ein einfaches und präzises Wiedereinsetzen des Ventilgehäuses ist durch den Justierstift (8) gewährleistet.
• Schrauben Sie nun den unteren Schraubdeckel (11) auf die Ventilbüchse (9) und drehen Sie die Minibal-Schraube (2) durch das Minibal-Gelenk (4) wieder in den Flügel (3).
Ventil und Ventilbüchse (9) sind wichtige Bestandteile des Instruments. Achten Sie darauf, dass beide nicht beschädigt werden!
Wird ein Drehventilinstrument regelmäßig gespielt, benötigen die Ventile in der Regel kein Öl. Wird das Instrument aber länger nicht gespielt, sollten diese geölt werden, um ein Festwerden
der Drehventile zu vermeiden.
Spülen Sie hierzu das Instrument mit lauwarmem Wasser durch und geben Sie dann lediglich ein paar Tropfen Ventilöl (Fast Öl Nr. 02) über den zweiten Zug in die Maschine. Achten Sie darauf, dass das Öl nicht am Zug entlang läuft, da sonst Zugfett in die Maschine gespült wird. Verteilen Sie das Öl durch Kippen des Instruments und gleichzeitiges Betätigen der Ventile. Lagerstifte hingegen müssen in regelmäßigen Abständen geölt werden (wie oben beschrieben).
Ölen der Drehventile
Vor und nach Gebrauch des Instrumentes sollten folgende Maßnahmen erfolgen:
• Lösen Sie zuerst den oberen Schraubdeckel (13) der Ventilbüchse (14) und ziehen Sie das Ventil (12) vorsichtig heraus. Achten Sie darauf, dass Sie dabei das Ventil (12) nicht drehen.
• Tragen Sie das Ventilöl gleichmäßig auf die Ventile auf (2-3 Tropfen Fast Öl).
• Setzen Sie die Ventile wieder ein und ziehen den Schraubdeckel (13) wieder an.
• Setzen Sie das Ventil (12) geradlinig in die Ventilbüchse (14) ein.
• Bewegen Sie nun die Ventile gleichmäßig auf und ab, damit sich das Öl gleichmäßig auf die Oberfläche verteilen kann.
• Tragen Sie nach dem Gebrauch erneut Öl auf. Dies schützt Ihre Ventile vor Oxydation und verlängert die Lebensdauer des gesamten Instrumentes.
Monatliche Reinigung der Perinetventile und Ventilbüchsen (14)
Entfernen Sie Verunreinigungen an den Ventilen mit einem fusselfreien Reinigungstuch (D).
• Schlagen Sie den Reinigungsstab (C) sorgfältig mit dem Reinigungstuch (D) ein und achten Sie darauf, dass keine Metallteile des Stabes frei liegen.
• Entfernen Sie Verunreinigungen in der Ventilbüchse (14).
Ventil und Ventilbüchse (14) sind wichtige Bestandteile des Instruments. Achten Sie darauf, dass beide nicht beschädigt werden!
II. Pflege des Druckwerks
Ölen Sie die Drückerachse (15) und die Kugellager (16) der Minibalschubstange (4) mit Miraphone Stiftöl. Trockene Gelenke nützen sich durch ständiges Reiben schnell ab.III. Pflege der Ventilzügeund des Tonausgleichs
• Ziehen Sie die Züge ca. alle 3 Monate heraus und entfernen Sie altes Fett und Verunreinigungen mit dem Reinigungstuch (D).• Spülen Sie die Züge anschließend mit lauwarmem Wasser. Trocknen Sie die Züge gründlich ab.
• Verteilen Sie auf die Züge gleichmäßig Miraphone Zugfett.
• Verwenden Sie bei einem Tonausgleich (1) spezielles Tonausgleich-Öl.
• Fügen Sie alle Züge wieder ein.
IV. Mundstückreinigung
Spülen Sie das Mundstück mit lauwarmem Wasser durch und reinigen Sie es anschließend von innen mit der Mundstückbürste (E).V. Innenreinigung
Spülen Sie zur Innenreinigung das Instrument regelmäßig mit lauwarmem Wasser durch. Ziehen Sie dazu auch die Ventilzüge heraus und spülen diese durch. Sie sollten auch klares Wasser direkt in die Ventile spülen.Warten Sie nach dem Spülen alle beweglichen Teile nach Punkt I, II und III der Pflegeanleitung. Achten Sie auf intakte Hufeisenanschläge und Wasserklappenkorken.
VI. Lackpflege
Entfernen Sie Verunreinigungen auf der Lackoberfläche mit dem Reinigungstuch (D) und einem La Tromba Lackpflegemittel (B). Für versilberte bzw. vergoldete Instrumente verwenden Sie Silber- oder Goldpolitur (im Fachhandel erhältlich).Verwenden Sie keine herkömmlichen Polituren zur Oberflächenreinigung Ihres Instrumentes! Der Lack kann dadurch beschädigt werden. Achten Sie auf Gegenstände, die Kratzer am Instrument verursachen können (Ringe, Uhren, Gürtelschnallen etc).
VII. Posaunenzugpflege
Ziehen Sie den Posaunenzug vorsichtig heraus und wischen Sie ihn mit dem Reinigungstuch (D) ab. Zur routinemäßigen Reinigung des Zuges empfiehlt sich lauwarmes Wasser und das Slide-O-Mix Reinigungsset. Trocknen Sie den Innen- (18) und Außenzug (19) nach der Nassreinigunggründlich ab und stecken Sie ihn wieder zusammen, bevor Sie ihn präparieren.
Anwendung von Slide-O-Mix
• Tragen Sie vom Inhalt der kleinen Flasche einen dicken Tropfen auf die Stiefel (19) des Innenzuges (18) auf. Ziehen Sie den Außenzug (17) auf und bewegen Sie ihn gründlich hin und her. • Tragen Sie vom Inhalt der großen Flasche Flüssigkeit auf die Innenzüge auf, so dass sie von oben nach unten (ca. 10 cm) herunterläuft. Verteilen Sie anschließend die Flüssigkeit durch Zugbewegungen.
• Sprühen Sie mit einer Sprayflasche Wasser auf den Innenzug (18) und wiederholen Sie diesen Vorgang bei Bedarf. Als Ergänzung zu diesem Set ist die handliche Slide-O-Mix Sprayflasche zu empfehlen. Trocknen Sie nicht nach.
Jeder Zug verhält sich konstruktions- und gebrauchsbedingt anders. Die für Ihren Zug optimale Dosierung der einen oder anderen Komponente werden Sie schnell selbst herausfinden.
Wenn der Zug nicht durch Staub oder sonstigen Schmutz behindert wird, ist es nicht nötig, den alten Slide-O-Mix Gleitfilm vor der Nachdosierung zu entfernen.
VIII. Zubehör
Pflegemittel
Um Ihnen die Pflege Ihres Miraphone Blechblasinstruments zu erleichtern, haben wir abschließend eine Auswahl der wichtigsten Pflegemittel für Sie zusammengestellt.
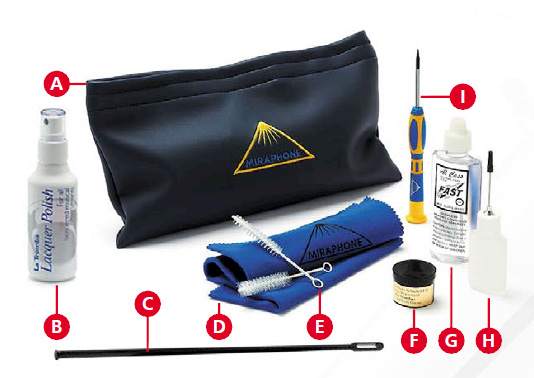
Schaubild Pflegemittel:
A - Pflegeset-Tasche; B - La Tromba-Lackpflegemittel; C - Reinigungsstab; D - Reinigungstuch; E - Mundstückbürste; F - Miraphone-Zugfett; G - Fast Öl; H - Miraphone Lager- und Stiftöl; I - Torxschraubendreher
Ersazteile
In Ihrem Blechblasinstrument werden unterschiedliche Einzelteile und Baugruppen mehr oder weniger stark beansprucht und unterliegen einem normalen Verschleiß. Müssen sie ausgetauscht werden, sollte man stets hochwertige Ersatzteile von Miraphone verwenden.
Die gängigen Ersatzteile für Ihr Blechblasinstrument hat Ihr Musikfachhändler auf Lager, seltener benötigte Teile kann er kurzfristig bei uns bestellen. Allen Miraphone-Ersatzteilen gemeinsam ist, dass sie „wie angegossen“ passen und so kurze Reparaturzeiten ermöglichen.
GigBags and Etuis
Bei der Qualität geht Miraphone keine Kompromisse ein. Was für unsere Blechblasinstrumente selbstverständlich ist, gilt auch für unser umfangreiches Etui- und Gigbag-Sortiment. Denn der Wert des Inhalts übersteigt in der Regel den eines Etuis oder Gigbags um ein Vielfaches.
Unsere Gigbags und Etuis ermöglichen den sicheren und praktischen Transport sowie die geschützte Aufbewahrung Ihres Miraphone Blechblasinstruments.
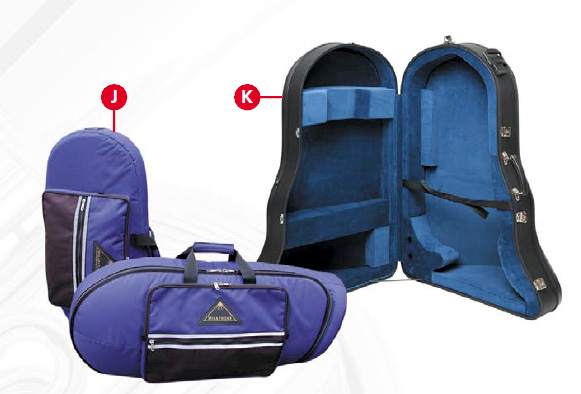
Schaubild GigBags und Etuis:
J - GigBags; K - Etuis
IX. Allgemeine Hinweise
Bitte tragen oder halten Sie ein Instrument niemals am Daumenring!Geben Sie dem Instrument nach dem Spielen bzw. Reinigen Zeit zum Trocknen. Wenn Sie das feuchte Instrument sofort verpacken, fördert das die Korrosion. Entfernen Sie das Kondensat nach dem Spielen.
