PIRASTRO KorfkerRest® Manual of using
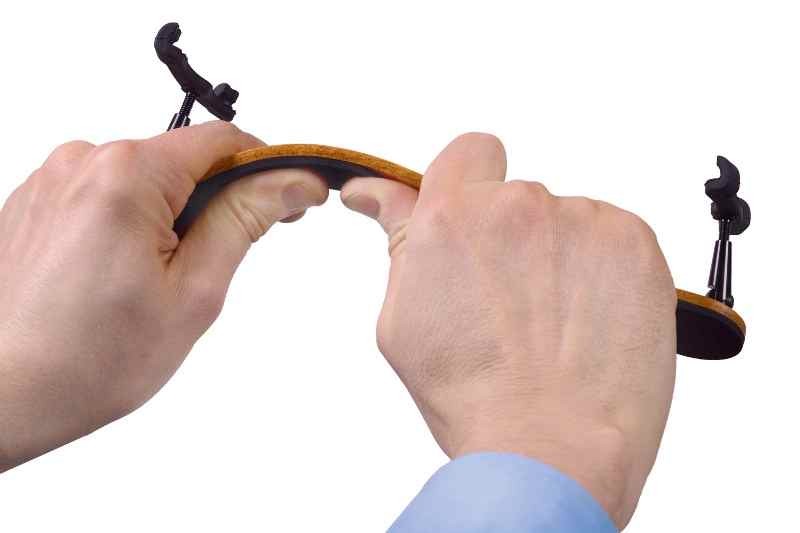
1. Bending the rest

2. Normal bend

3. Maximum bend
WHEN BENDING THE WOOD PLEASE KEEP THE FOLLOWING IN MIND:
- The fibres of the wood need time to adjust to a new shape, therefore always bend the rest slowly and carefully. Fast and forceful bending will damage the wood and may cause cracking
- The rest has a bending limit. By bending it slowly and carefully you will feel when the rest cannot bend any further. Do not force the wood to bend beyond this point.
- Please keep in mind that small adjustments can have a significant effect on comfort.
- Clamping the rest onto the instrument will increase the shoulder curve slightly.
- When the rest is bent and its shape altered, the legs might need to be readjusted. Please refer to the section entitled »Adjusting the legs«.
- Ideally, after bending it to the required shape give the wood 2-3 hours off the instrument to stabilize before regular playing.
Adjustin the legs
Each leg has a Torx screw connecting the hinge joint with the base joint and a Torx flange screw connecting the base joint with the wooden bridge. When the Torx screws are tightened correctly the locking rings prevent movement between the hinge joint and the base joint and between the base joint and the wood. These four locking rings are essential to the functioning of the rest and should be replaced if lost or damaged (6 replacements included).

4. Ideal angles of the legs
Adjustments to the legs should be made in small increments. For the maximum stability of the rest it is very important that the shoulder leg and chest leg meet the instrument at
a straight angle when attached. When not attached the two hinge joints of the rest lean slightly towards each other (see picture 4). In order for them to do so and to ensure the ideal position of the wooden bridge in relation to the instrument, whatever adjustment is made needs to be divided between the shoulder leg and the chest leg.
After changing their position, look at both legs sideways and make sure the adjustment screws of the rubber feet are parallel to each other (see picture 7). When placed feet downwards on a flat surface, all 4 tips of the rubber feet should touch the surface. If they do not, adjust the tilt of the hinge joint of the chest leg.
After making adjustments always check all screws have been tightened.
Narrowing the rest
Increasing the angle of the hinge joint of the shoulder leg inwards (see picture 5) will narrow the rest and create a stronger clamping action. In order to adjust the hinge joint, loosen the Torx screw enough to allow the joint to move. Move it to the desired position and tighten the Torx screw.
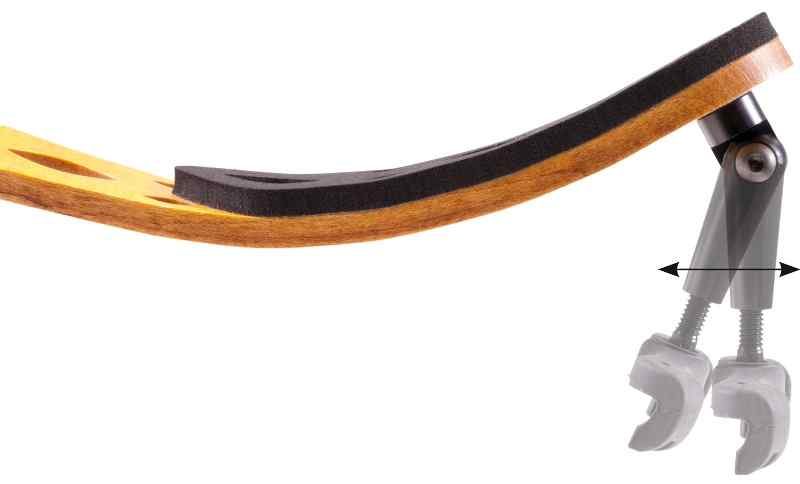 5. Angle of the shoulder leg
A similar adjustment needs to be made to the chest leg (see picture 6). To make the rest narrower, loosen the Torx flange screw and slightly rotate the base joint clockwise. After tightening the Torx flange screw, loosen the hinge joint. Hold the rest down on a table with the feet parallel to each other and all four hooks of the rubber feet touching the surface. Fix the resulting angle by tightening the Torx screw.
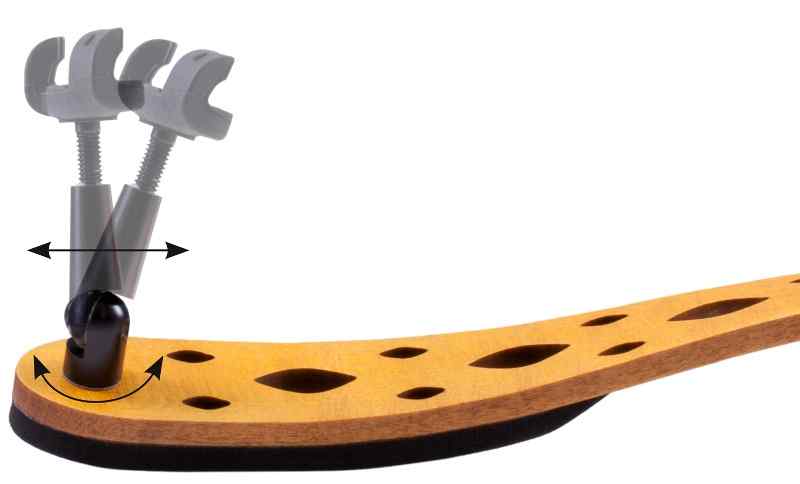 6. Angle of the chest leg
Widening the rest
Straightening the hinge joint of the shoulder leg by bringing it outwards will widen the rest and create a weaker clamping action (see picture 5). In order to adjust the hinge joint, loosen the Torx screw enough to allow the joint to move. Move it to the desired position and tighten the Torx screw.
A similar adjustment needs to be made to the chest leg (see picture 6). To make the rest wider, loosen the Torx flange screw and slightly rotate the base joint anticlockwise.
After tightening the Torx flange screw, loosen the hinge joint. Hold the rest down on a table with the feet parallel to each other and all four hooks of the rubber feet touching the surface. Fix the resulting angle by tightening the Torx screw.
Adjusting the tilt of the rest
The tilt of the rest can be adjusted as seen in picture 7. In order to increase or decrease the tilt of the rest, start with the shoulder leg. Loosen only the Torx flange screw and slightly rotate the whole leg clockwise to increase the tilt or anticlockwise to decrease it.
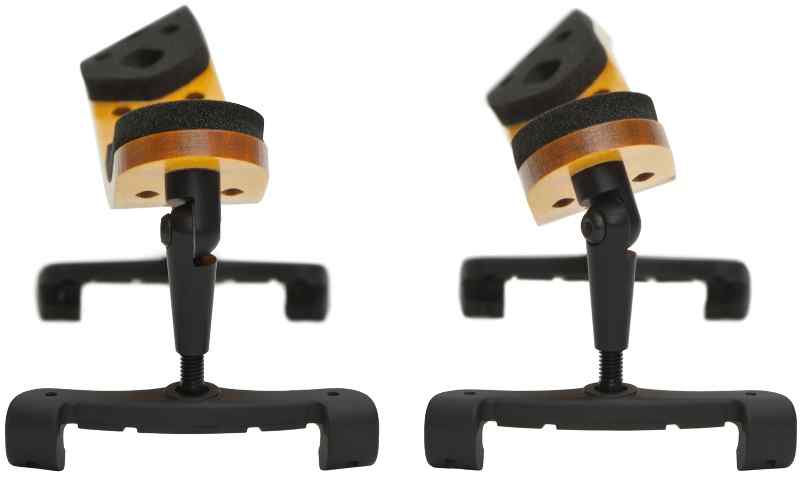 7 Straight and angled tilt
A small rotation will have a noticeable effect. After tightening the Torx flange screw, loosen the hinge joint of the chest leg. Hold the rest down on a table with the feet parallel to each other and all four hooks of the rubber feet touching the surface. Fix the resulting angle by tightening the Torx screw.
Returing the rest tu its original position
In its original position and when not attached to the instrument (see picture 4), the two hinge joints of the rest lean slightly towards each other. This gives the best grip on the instrument.
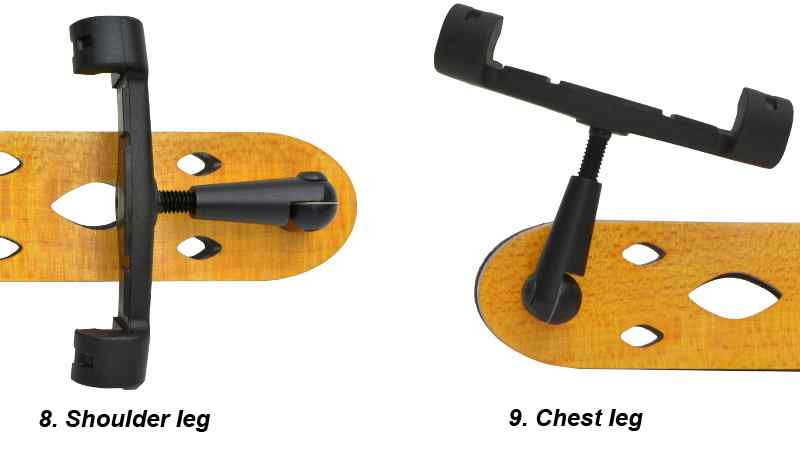
To return the rest to its original position first loosen all four screws. Continuing with the shoulder leg, point the rubber foot towards the centre of the rest as seen in picture 8 and tighten the Torx flange screw. Now swivel the hinge joint up to the angle seen in picture 4 and tighten the Torx screw.
Continuing with the chest leg, position this as seen in picture 9 and tighten the Torx Flange screw. Hold the rest down on a table with the feet parallel to each other and all four hooks of the rubber feet touching the surface. Fix the resulting angle by tightening the Torx screw.
The ErgoPack
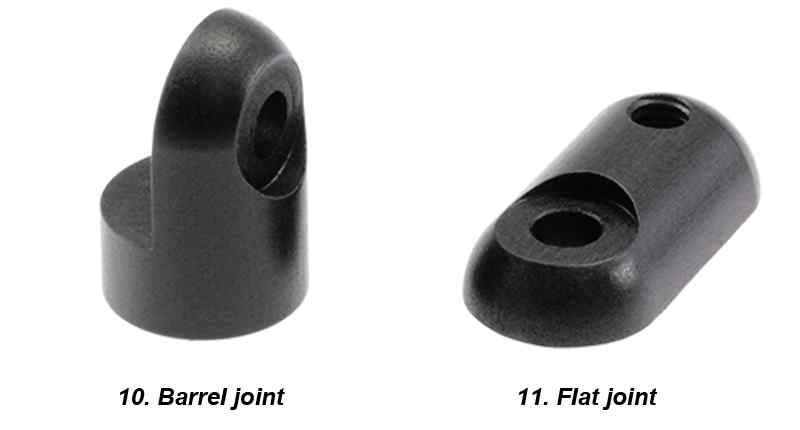
Among the accessories of the PIRASTRO KorfkerRest® Model 2 you will find the ErgoPack. This consists of a barrel shaped joint (picture 10), a flat joint (picture 11), screws and locking rings. These two joints increase the number of positions which can be achieved with the KorfkerRest® and help to adjust the Viola model to a wide range of instrument sizes.
INSTALLING THE ERGOPACK
In order to add one of the ErgoPack joints to a leg, install the chosen ErgoPack joint in between the base joint and the hinge joint. Be sure to insert one of the locking rings into each connection and tighten all Torx screws well. Extra Torx screws and locking rings can be found in the accessories.
The ErgoPack has proven to be especially useful for those with narrower violins, where narrowing the rest as described does not provide the necessary stability and the rubber feet tend to slip during playing. For those players we advise to use the adjustments for »Narrower Violins«.
Many players have found that bringing the rest closer to the body has given them more freedom of movement of the left arm. To try this, use the adjustments for positions »Closer to the Player«.
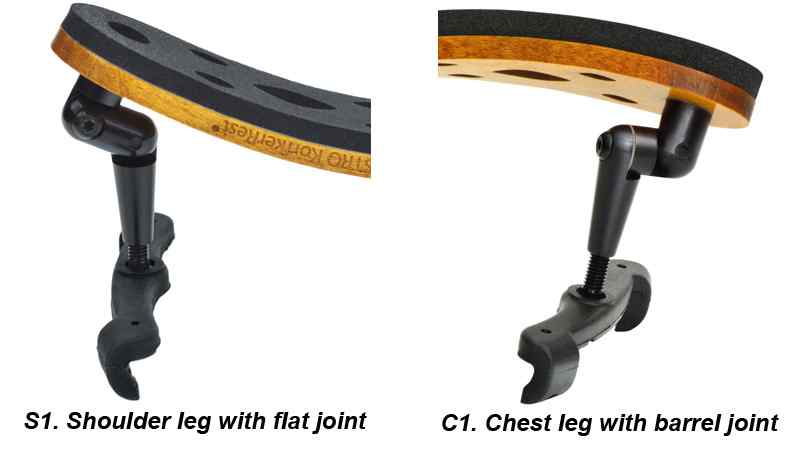
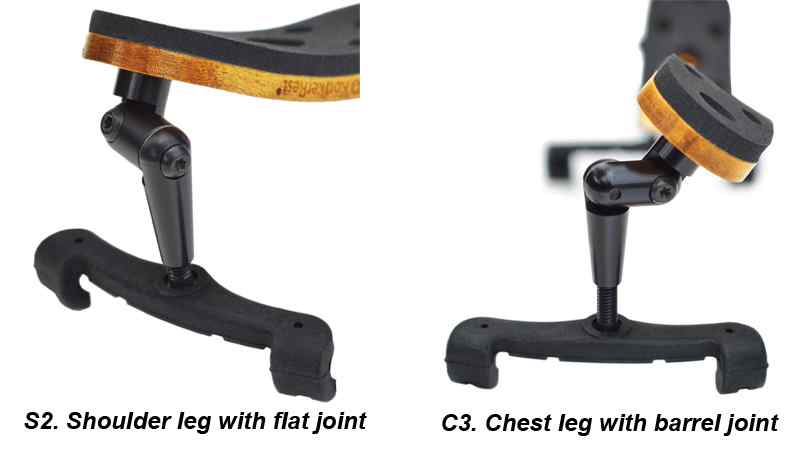
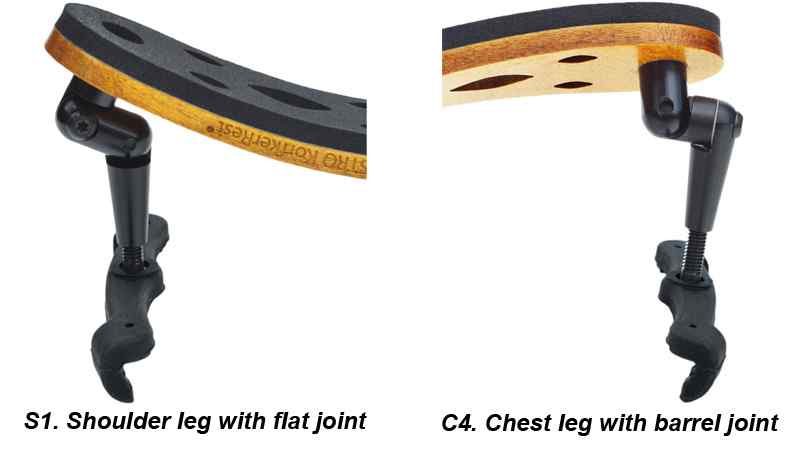
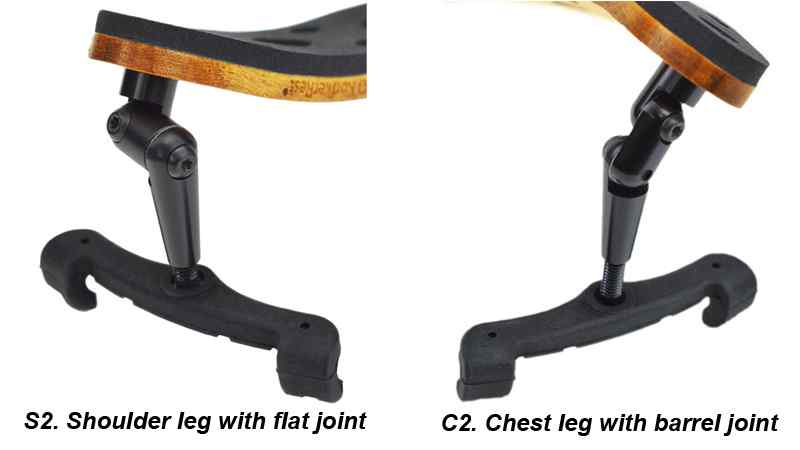
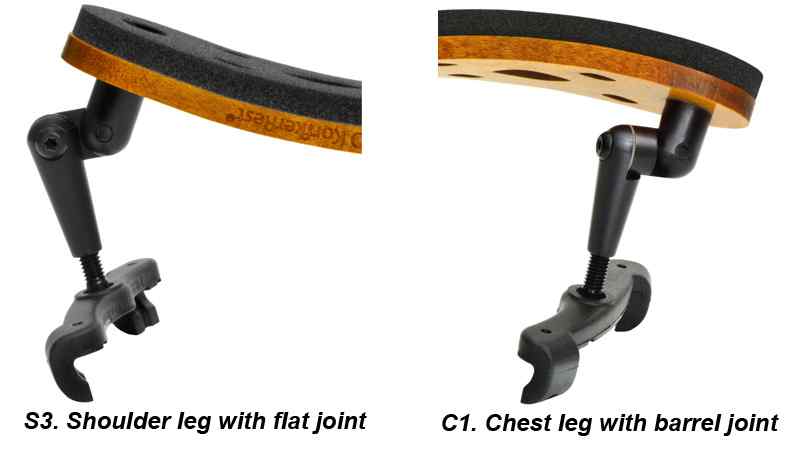
The standard options for installation of each ErgoPack joint have been given lettered pictures for ease of understanding.
The most popular configurations vor violin using the ErgoPack
NARROWER VIOLINS
Adjusting the rest for narrower violins can be done with S1 or C1. Using S1 the rest will point further over the shoulder, using C1the rest will lie more towards the chest.
In special cases the KorfkerRest can even be made to fit 3⁄4 violins by using both S1 and C1. Please check if the size and height of the rest are suitable for the young player in question.
CLOSER TO THE PLAYER
To bring the rest closer to the player use both S2 and C3
FURTHER OVER THE SHOULDER
Position the rest further over the shoulder with both S1 and C4.
HIGHER POSITIONS
To elevate the position of the violin use C2. Using S2 simultaneously with C2 can give further comfort by positioning the shoulder side of the rest where there is less space between the violin and the shoulder.
LOWER ON CHEST
To move the rest towards the chest use both S3 and C1.
Replacing the rubber pads
Starting off at one of the ends, first remove the worn out rubber pad. Peel the backing off one of the replacement rubber pads included within the accessories. Start by aligning the round hole exactly around the Torx flange screw, then align the other end of the pad around the large eye. While slightly flexing the rest, press down the middle part of the pad. Before using the rest, press the whole rubber pad strongly onto the wood, especially around its entire edge.